Wednesday, 1 August 2012

Garden plaque


Sometimes it nice to step outside the 'box' so to speak and into the garden here's something different I tried out today , a way of using up scrap glitters and creating something nice for your home

Items used 
Stampdenous embossing enamel powders (aqua, ivory and rose)
Stampdendous crushed glass glitter ( steel blue and fresh green)
Gold embossing powder
cream, green and black card
kanban clock toppers
Sentiment  

I found if you mix your Stampendous embossing enamels Stampdendous crushed glass glitter and Stampdendous mica fragments with some thick embossing powder , you can reproduce something that resembles stone/concrete. don't be frightened to get in a mess and experiment , if you're doing it right you should end up with a gruesome looking mixture but when its melted onto a frame it looks the business. I added some gold embossing powder to the finished frame to get it a little sparkle. this is a good way of using up old bits of glitter and embossing powders 

First take a cheap pine frame this is one from ikea comes in a set of 3 for 99p,     give it a generous coat of 'stick and spray' and then dip in your 'mix'. melt with your heat gun and leave to rest , repeat a few times till you feel you have a thick and believable look. I added some Stampdendous mica fragments to the mix they do one which looks like fish scales and it works tremulously well in this case. Then tint with some gold embossing powder. hopefully before you know it, you will have the whole frame covered in 'mock stone '. Don't forget to do the sides as well as if you don't, that will give the game away that it's actually made of wood!!!!!

Take some cream card and emboss this through your cuttle bug, using the M-bossibililies folder 'Regal'. Ink all over with Tim holts 'peeled paint' green ink pad and a gold ink pad on the high spots and cover with clear embossing powder .  Heat till powder is totally melted and then add a light dusting of gold embossing powder,  heat again. mount this onto black card and glue onto frame . you will need to coat everything paper totally with an embossing powder if you plan to put this in the garden at any time as it will not be waterproof otherwise and may turn to papermach'e in the next rain shower, mine will go on a wall inside by my patio doors, better to be safe than sorry !!

Build your clock now, I used a Kanban clock face from a set I had and used a small picot edged spellbinders shape to cut out the middle section of the clock face  then using another kanban clock face for the centre I put the three pieces together. The hands of the clock were cut from the sizzix clock and the brad in the centre was from some paper candy dots I had in my crafty stash.

Once you have constructed your clock, mount it onto a a spellbinders large oval die-cut shape cut from grey pearlised card stock and place to one side on your plaque.

I printed off a Sentiment from the
pc which matched the feel of the project it isn't a famous quote to my knowledge just my opinion of how to spend time... This was then mounted onto black card and added to the plaque


The butterflies were cut out using a  marianne butterfly die its quiet a old one and but comes out a lot as it is so versatile, there are many butterfly dies that would do the same as this one. I cut out four in a light green card and then embossed them and inked through the die with the 'peeled paint' green ink pad before releasing the card . this gives it that  two tone green look.
When this was done, I covered them in embossing powder, melted them and glued two together to create a 3d butterfly, then I added a few beads of white liquid pearl down the middle of their backs to create their bodies when that was dry they could then be mounted in the corners of the plaque as extra embellishments to finish it off .
This is my first ever wall plaque and though it isn't weather proof enough to go outside I still think it turned out ok , and if that conservatory hubbie's promised me ever gets built, it will make a nice addition to it, till then it will take pride of place by my back door in my dining room
hope you like it ,

Tracey xx


Tuesday, 17 July 2012

Rock Chicks and Route Stitchy Stitch

Hi guys


In the post this morning came my long awaited 'CRAFT' patch (not that the company that made it kept me waiting they were great!!) no I have been hunting high and low for the last year trying to find someone who might sell me one after spotting on a friends leather waist coat. luckily I found someone that would make it for me instead!! It is a tradition to collect patches of places you have visited and things, sayings that make you smile and to sew them on to a waistcoat to wear at biker gatherings. Much like a car owner would put  a bumper sticker on his car..... Apart from the obvious CRAFT also stands for 'Can't Remember A Flippin Thing',So is totally relevant to me. what was I saying.. O yea... If you have a friend who has a nickname or a favourite saying, why not pop over to Route Stitchy Stitch and have Neil make you a patch for them. or buy one of the pre made ones,  BE WARNED, you will need a strong sense of humour for Route Stitchy Stitch as it aimed at bikers and not the Sunday School Teachers!!

Just a quick note today as the sun is finally out and there are loads to do in the garden still.

Here is a card is made of my alter ego ( The skinny version of course) They say inside every big girl there is a skinny one trying to get out, I keep mine quiet with Chocolate!!! Seriously I do have a red motorbike and blonde hair but unfortunately that is where the similarity ends.


Anyway the stamp is one of the range from the KennyK Collection at WhimsyStamps.com. I used my Pro-markers and Spectrum noirs pens to colour it in and the guitar was made from some black card, a stencil and some bronze DreamWeaver embossing paste, finished with a good sprinkling of ultra fine glitters. There's some Halo glitter to highlight parts of the bike and on the flowers too.  Well I better get on now, those rotten old weeds won't pull themselves up.

 keep an eye out on the blog, in the next few days I will be doing some Christmas cards for my old mates at Stamposaurus.co.uk from their 'Christmas Mischief 'range and I'm really looking forward to it.  If you're off to Doncaster this weekend Give the folks at Stamposaurus and J and C Creations a visit and say hello from me I'm off to a BBQ and Biker Party in Hampshire with my fellow Rock chicks xx (and hubby of course)

Rosie xx


Sunday, 15 July 2012


Purrr..fect Anniversary Easel Card


You will need
Cream cardstock 14 x 14 cm
Pattern paper
strip of lace paper
gold mirror card
pink dew drops
large gem heart
paper button candies
Glitter

 Step 1
First take some plain white card and cut a square 12 x 12 then stamp your image of the cats onto it. Then centre the image inside your  'Fleur de lis' spellbinder die and run though the cuttlebug. Cut and emboss but DONT remove the die. use your 'aged mahogany' and ink round the outside of the die-cut then remove the centre and cover the inside of the square with some waste paper and ink up the edges. I finished the edges off with a little glitter. when it is dry colour the image with your spectrum noirs or pro-markers, I used both for this card. Put the centre and the frame together again and stick the two to each other with some tape on the back. add a pink dew drop in each corner and then put the finished topper to one side for the moment.


Step 2
Take a 14 x 14 cream card and fold the front flap in half . so you have a card with a square back and a folded in half front .This is the basis of your Easel card, cover the base of the card with some patterned paper.

Step 3
 Then take some white card stock and cut a 12 x12 square. Emboss with your 'Mystic' M-bossibilities folder then gently ink all around the edges of the square with your 'aged mahogany' ink pad and matt and layer this onto some gold mirror card. Then stick this onto the base of your cream easel card.

Step 4
Take your base card and cover 1/2 flap (farest from the fold) with the patterned paper that matches the base of the card
Take your topper and stick it in the middle of the covered 1/2 flap of your cream card so it stands on top of the larger square

Step5
make a bar out of gold mirror card and add your strip of lace paper then cut several swirls out of gold mirror card using your Festive Greenery Sizzix die add these to the bar with some paper flowers and attach to the base card. This bar is what stops your topper from slipping down.

Step 6
Cut the 2 spellbinder shapes from the iron works and pirot edged circles and mount together then add the large heart gem in the middle, stick to the base card. add the sentiment on the topper, and a few paper button candies on the base and the card is finished.

All items highlighted can be found onthe J and C Creations Website, why not pop over and have a look

Tracey Anne xx

Friday, 13 July 2012

Buttons and bows


Hi folks

well the weather is still rubbish, so there has been plenty of time to lock myself in my new craftroom and create.

Here's my contribution to this months J and C Creations Blog why not pop over and enter their challenge 'ANYTHING GOES' you could win yourself a £20 gift voucher to spend on crafty goodies 

BUTTONS AND BOWS

You will need

14 x 14cm card blank
Silver mirror card
'Grandma's button box' backing paper
Paper doily
assorted pastal coloured buttons
blue lace ribbon
white lace frilly ribbon
clear dew drop


First matt and layer some silver mirror card onto your base card then add 'Grandmas button box backing paper' (easier done than said, lol x) add ribbon and tuck under silver mirror card before mounting onto base card.

 cut your sizzix die 2 times, once in silver for the scirrors  and then in cream of the spindle and the base to stick some real buttons on. . cut out the items so they are seperate. cut out your spellbinders shapes and ink them up with your distressing ink 'china blue' while they are still in the dies. matt and layer them and then add sentiment.
 place doily and spellbinders shapes on base card and then add sentiment topper and sewing items. (Add blue lace ribbon to spindle before sticking down) stick buttons on randonly and add dew drop to bow.

All items highlighted can be found onthe J and C Creations Website, why not pop over and have a look


Wednesday, 4 July 2012


Here comes Summer...

Well its finally stopped raining for a day and the sun is thinking about coming out from behind the clouds but i dont think I'll throw on my bikini just yet. We had a lovely weekend catching up with the girls from J and C Creations at the papercraft show at Bracknell Leisure centre, though I may have spent a little of my budget for that day. Hey ho, you cant take it with you so may as well spent it I say. Its not a bad venue with loads of room to wandle round the only thing missing was a nice tasty cake stand to keep 'him indoors' happy. I must admit I quiet like to indurge in a carrot cake on special occasions but I swear if he had a choice he would eat it morning noon and
night and of course he doesnt ever gain a pound!!!
Anyway while we were there we bumped into Jayne and Co from Stamposaurus and she very kindly gave me a stamp from her new range to play with. Its called 'campervan sidelong view' and was designed by Diane Loverseed and can be found on there website Its a lovely large stamp which produces a clear image everytime, I spent most of yesterday colouring in with my faithful promarkers and managed to produce 4 cards. As usual I apologise deeply for the photos, as my skills in photography are seriously lacking!!

Here are the results, I've kept them bright and cheerful and tried to inject a little sunshine, hopefully they willl brighten up any mantlepiece no matter what the weathers doing outside I hope you like them as much as I liked making them. There is such a lot of detail in the design and everytime I looked at it I found something new going on.


The stamp is a Combination of a large campervan, then 3 smaller stamps which are a campfire, signpost and a flower.
on the card to the right, I have used the techinque of paper pieceing on the fold-up part of the camper,s roof using the patterned paper from behind, it tries it in nicely I thought.
 I've also included some cards I have made using some of the stamposaurus stamps the pirate card comes with a free badge courtesy of sainsburys I found them in the kids department on sale for 25p for 4 bargain!!
Had to include the campervan you have to love the Volkwagon type 1 with its split windscreen, thats how you know its the real deal.


Heres an adorable little bulldog that I have used in loads of Jubilee cards , this one was for father's day last month. I kept it simple and stuck with the red, white and blue colour scheme.


Monday, 2 July 2012

When they fly the nest.....


Well it finally happened, my beloved 28 year old daughter Lisa has moved out and is now sharing a flat with her best friend and her crazy  cat. The transition was smoother than expected as she had been dropping stuff over at the new place for a few weeks before she even broke the news to us.  After the initial sadness (which lasted at least 10 minutes) had subsided, the madness of moving house in house began. First there was her old room to clean and her new room (6 miles away)to decorate, guess who got that job!! you would think when they leave you are released from such chores... no, it seems if you can hang wall paper you can come over to the new place and check it out and then of course they say  'oh by the way mum how do you hang wallpaper???'  Then there was her old room to paint as youngest daughter didnt care much for older Sister's tastes. That took care of the weekend. Eventually the girls were content and I could marvel over the wonderous sight that was the empty Box-room.
 My Box-room!!
So out again with the paper stripper , 3rd times a charm they say.. At this point hubbie took pity on me and decided to help, bless him. walls cleaned woodwork painted and wallpaper's up and floors are down. 4 days later the loft is cleared and paper, paint, and stamps have travelled the 10 yards downstairs, from cricut to clear acetate everything is moved in and I'm in my own little piece of heaven.

No more cold winters in a draughty attic or sweltering hot summers without a window to open, no more running up and down the loft ladder like a rat up a drain pipe every time the door bell rings!!! my own little craft room/office with natural daylight and central heating, o joy of joys!!! So it was all worth it in the end, The girls are delighted with their new rooms, my crafty stash and the Pc all fits though rather snuggly into the little room and the 'old man' gets to watch TV in peace while the 'missus' crafts away till the late hours. And the 'cherry on the cake 'I couldn't afford a new desk for the room and grandmas old dining table was looking rather tatty after 40 years of service but one of Pauls 'moments of  brilliance' hit when he suggested jokingly 'why not cover it with the left-over laminate flooring...' result clean, new table surface to work on. (The pegs are off it now, its stuck firmly to the old one.) The mans a genius just dont tell him I said that .

Penny Black Saturday Challenge


Hot Metal

What a crazy fortnight its been , apologies for the lack of blogging, there have been computer gremlins, flu bugs and teenage challenges for the last 14 days , 3 bedrooms have been redecorated, new floors have been layed and nerves have been frazzled. Unfortunately when that annoying thing called 'life' gets in the way, crafting has to take a back seat for a while. So I'm back now and all revved up to get going on with the million new ideas I had buzzing round my head.  Here is my contribution to Penny Blacks Saturday Challenge I hope you like it

I used 2 Penny Black stamps from their 'Trims' clear set , the first in Tim holts 'broken china' blue ink to stamp the backing card in the cris-cross pattern.  I used a woodware corner punch on the corners  and inked them with a Tim holts 'dusty concord' distress ink. This was then mounted onto black card. I used Tim holts 'aged mahogany' on the main topper to stamp the star bursts. then added a memory box die cut from mirror card into the centre and then added a star burst which I had cut out, this was all mounted onto black and white card and decorated with red gems, Silver candy dots and pink dew drops.

All the highlighted items used in this project can be found on the J and C Creations Website, why not pop over and have a look round, apart from the wonderful range of products they sell , they now have their own blog where you can check out all the beautiful designs by myself and the other talented members of their design team.


Tuesday, 19 June 2012

Grunge it up...


Go grungy and decorate anything using the Tim holts distressing inks 
Heres a few items I've 'grunged' up with a matching pattern on them, using Tim holts distressing inks, gold flake, bleach and a black ink pad.


On the small pine chest I first covered the chest with tissue paper pasted on with watered down pva glue. I left this to dry completly then grunged it up with a fired brick and dusty concord coloured ink pads. Then I dibbled bleach over some of the ink to lighten areas, you need to only a tiny amount to do this. I added some gold flake and then stamped up with a roman clock pattern and a small dandylion stamp


This tinket box is made using the same techinque as the chest , I have added a few gems a flower and a butterfly. The base box is recycled card and the plain
boxes can be found in loads of different shapes at most craft shops for a few pounds, this one cost me 99p!!


Below is a matching birthday card which would complement the set nicely if I planned on giving the set as a gift...


I like to make a range of cards and projects and think sometimes its good to leave your 'comfort zone' from time to time, so I plan to start adding a few new ideas in the future. hope you like these.
 Please feel free to leave comments and follow my blog 


Saturday, 16 June 2012

In the Garden

Penny Black Challenge


Here's a card I made for the penny black Challenge using the 'In the garden' Stamp Set. This stamp set can be found on the J and C creations website with many other fabulous penny black Stamps to choose from. I stamped the cat image and added the foliage and butterfly after. It was coloured in with pro markers, then mounted in a fancy floral oval spellbinder shape which has been cut from white card.The centre edge has been dusted with a blue Tim holts distressing ink pad 'faded jeans' and the outside edge with a green 'peeled paint' distressing ink pad and the blue one again. I love distressing inks and use them all the time.

I enhanced the edge of the oval on the spellbinder shape with some glitter glue which gave it a real sparkle. I added some decoupaged flowers using a small flower stamp and some butterflies made from silver mirror card and peel off stickers, and hey presto, the topper is complete.


 I have cut some blue pearlised card and run it though the cuttlebug in an embossing folder and cut as corners. The corner flowers are peel-off sticker flowers mounted on acetate and then cut out. each one has a gold brad through the centre.  Add all this to some pretty paper and then matt and layered onto some more patterned card and mounted onto a black 14 x14cm blank cream card and the card is finished. Don't forget to add a sentiment.

 Penny Black do a huge range of stamps and you will find a great selection on theirs and J and C Creations website xx 


Friday, 8 June 2012

SPELLBINDERS 'Chateau Window' Die cards


Here are a couple of cards I made for J & C Creations last month, I have included all the instructions, tips and components to help create a simalar look  

The first is a window card made using spellbinders Chateau Gate (window)  dies, if you look in you will see a fireside view. The other is of a chatuea using the same die but as a single this time and using the matching stamps from Heartfelt creations . 2 totally different cards made from the same die hope you like them


WINTER LODGE CARD
you will need
5 x 7 card blank
black and white card
gold and silver mirror card
Clear embossing powder
clear Acetate 3'' x 4''
2 small flower punches
red and clear small gems
 
 
First Cut 2 frames from the spellbinders windows die in gold card and remove doors stick together to make large window and cut acetate to fit inside frame . cut a piece of black card 4.5'' x 6'' and stamp down the card with the wood grain stamp with versamark then sprinkle with Stampendous embossing enamal aged Ivory, melt from underneath than dab versamark pad over all the card and dip in clear embossing powder melt and sprinkle with taupe colour fragments. cut aperture in centre of card 2.2' x 3'' and fit window frame over . Punch some medium flower shapes from white card and stamp with versamark then sprinkle and melt aged Aqua and Aged Rose on them , 4 of each colour. use a slightly smaller flower shape for the center, dip these in clear embossing powder and melt. while the powder is molten sprinkle with gold halo glitter, keeping fingers out the way as it gets really hot! after its cooled build the eight flowers, and add a red gem in the centre of each. put a stamp image on inside of window I did a fireplace scene using heartfelt creations window accents stamps and promarkers Matt and layer onto gold and black card and mount on 5 x 7 blank decorated corners with flowers and add silver leaves to accent. add a clear gem to undecorated corners of window frame

CHATEAU WINDOW CARD

you will need
Black and white card
Spellbinders chateau gate die
Vintage UT Embossing Crystals – Tarnished Silver (black,silver)
Heartfelt window accents stamp set
brown ink pad
memento ink pad
versamark ink pad
Martha stewart bangle punch
bird stamp
paper roses
ribbon
peel off butterflies

First Cut out your spellbinders window die in black card, stamp with versamark and then coat with Vintage embossing crystals Tarnished silver. Melt with heat gun and leave to cool. Take some white card and stamp and colour bird image. Ink up some more white card with your brown ink pad and stamp on the wood grain and doors in black, cut out rectangle 3'' x 3.5'' place bird image onto it and place window frame over top than cut out doors and cover outside of window flaps. matt onto some black card. take a piece of patterned paper and matt and layer onto black card add a piece of ribbon and the punched bangle strip to it, add paper roses. matt and layer onto more card and add butterflies and a sentiment. The butterflies were made by sticking peel-offs onto acetate and cuting out and adding a few gems.

All items highlighted can be found on the J & C Creations website


Saturday, 26 May 2012

Fancy Fun Floral Ovals...


 Morning Crafters and what a glorious morning it is, the sun is beaming in and the weather man has promised us 27 degrees by lunchtime. If I'm going to do any work today best get upstairs before the heatwave hits, as my little loft can get rather hot during the summer season ( and its only May!!)

Mr Postie came yesterday bearing gifts for evil-bay thanks to iconuk.crafts for my Nestabilities Spellbinders  Floral Oval die set , a bargain at £15.49 including p&p. have been enjoying myself playing with them and creating some lovely cards.  Here are a few I thought you might enjoy seeing. The stamp was from Elizabeth Bell and the range is called 'Bells and Whistles' and was purchased from my friends at J and C Creations you can also find the moccoran motif spellbinders on their website too, which is what was used as a base for the sentiment . The image I coloured in with pro-markers, I then used the 'regal' M-bossibilities board again from spellbinders for the backing sheet, this was cut into 4 and matt and layered before placing on the main blank card. I added some paper flowers and finished with some pastal candy dots. A sweet little card for a childs birthday.

The beauty of stamping and 'colouring in' is the varity of different cards available to you to make, heres a blue version I did after by finishing the yellow and peach one above. By changing the backing paper and arrangment, you have a new and different card to share. All the elements are the same as the yellow card but I have added some fancy swirls under the sentiment this time. I love to stamp but dont always get the time and so have really enjoyed making these cards. I think I will have to send a few hours on this sort of thing more as I find its so therapeutic and calming to do in these hectic days we create for oursleves . It's good to take 'some chill' time once in a while...
Here are a couple of cards using the fancy floral Ovals again but this time with some Hunky Dory card stock, the Sentiment is from 'Clarity Stamps' and is by G Ghandi and is lovely, it reads
' If I had a single flower for every time I think about you, I could walk forever in my garden'
The floral Oval shapes were cut out of some Hunky Dory card stock I recieved free with one of their magazines and I bought a 2 sheet pack of their beautiful butterflies from Biggin Hill paper show last week. The corner punch is from Martha Stewart and you will see a lot of that punch in my cards as it is one of my faverites to use

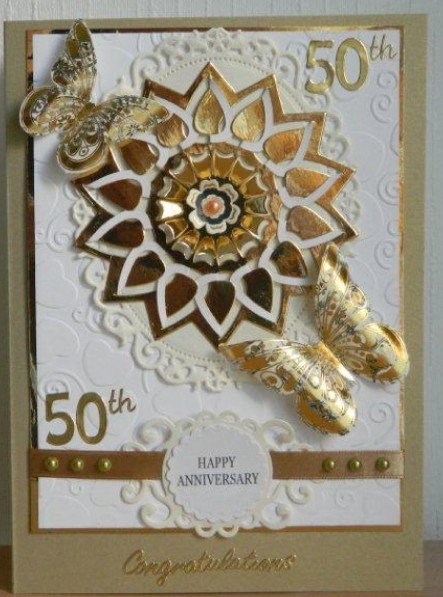
This card below has been created using the new spellbinders 'cut and tuck' range of dies, this one is called floral burst  and as the website says 'the new Spellbinders Shapeabilities Cut • Fold • Tuck die templates creates intricate geometric designs in a single pass.' They are rather spendid, its a shame the photo below isn't clearer as they make a fabulous card . The butterflies are a nice touch and are  from Hunky Dory and the floral Oval is behind the main flower again cut out of cream card, apoligies again for photo quality the backing paper, is just some plain white run though the  'fancy hearts' M-bossibilities folder. Simple buy classic. I choose to make mine a Golden wedding Anniversary card but simply change the gold to silver and you can celebrate a 25th just as easily 


I hope you like these cards and they help to inspire you in some way to creating your own works of 'art'
if you like what you see, why not leave a comment or follow me
everyones welcome..xx

Tuesday, 22 May 2012

twinkle twinkle...


Well what a lovely weekend just gone, had a fabulous time at the Biggin Hill paper show, met the girls from J and C Creations and had a chat and found some wonderful products on sale there . Made a few purchases as you do and Spent far too much money during the day but hay ho he can't take it with him, (he he.) and with so much to choose from , glitters, new spellbinder dies and more stamps than you can shake a stick at , its a must-do day out.  If you get the chance to go next year, check out the tea and cake stall as their carrot cake is to die for!! we always get some as its hubbies reward for carrying the bags and credit card . I have offered to leave him in the 'husband Creche' but he insists on coming round with me
 Anyway must tell you about a product I found called Dream weaver Embossing Paste, you mask down your stencils and then smooth this over then just add glitter and what fantasic results

you can use it with your plastic masks just make sure you have it masked down well and dont over work it or there is a danger of pushing the paste under the mask. It needs an hour to dry hard but is touch dry in 20 minutes so make sure you keep on top of cleaning your stencils , soapy water does the job nicely then dry well for the next project, I have had a small selection of metal stencils for a few years now that I have never really played with but yesterday they made a comeback to my crafting table and have earnt their keep so to speak. have also made a further purchase with Sweet poppy.co.uk and have ordered the christmas village and christmas baubles for the holidays at the end of the year so keep an eye out for them


Fathers day is only a month away so I will be beavering away upstairs on some cards to sell at the local fayres .  Have a lovely little bulldog stamp I will be playing with today, watch out for the up and coming cards from that and also some beautiful poppy stamps as many of my friends are British legion members I expect that they will prove to be very popular.


Saturday, 19 May 2012

Fishy Friday

Morning Crafters
well the Competiton on jandccreations.blog is in full swing, looking forward to seeing all the great entries. You will find my inspiration, FISHY FRIDAY along with my fellow team designers there check it out. There is a £20 gift voucher up for grabs so dont forget to enter
If you would like to know how to make this and what I used you will find all the instructions and products over at jandccreations.blogspot.co.uk

Roll on tomorrow when the Biggin Hill Papercraft Show in Surrey kicks off, you will find me there bright and early spending all my/his hard earned cash on more fabulous crafty stuff . If the weathers nice husband and I plan to ride down on our motorcycles, do a spot of crafty shopping (he'll be carrying the bags ha ha!!) and chatting of course. Dont forget to look out for J and C Creations Stand where you will find loads of good products and inky/stampy stuff to choose from, as well as some of my sample cards. 

Yesterday was spent like most other days entirely in the loft/craftroom, can honestly say I've spent as many hours up there as Anne Frank! Got loads done, new cards for an up and coming show in Losely Park ,Guildford next month , the cobblers assistant has been busy making baby shoes and  I even got a chance to have a tidy up!! It's amazing what you can find when you do a little house work.  heres some baby pumps  I made yesterday they are a great seller at the fayres and are reasonably easy to assemble, you can find the template for them on the My Craft Studio Encylpedia Cd volume 4. The label on the top was made using spellbinders picot edge circle die and some shalloped mirror card shapes.


So cute...

Tuesday, 1 May 2012

Flutterbies


Good Afternoon Crafters

 At last the sun has finally come out and the skies are blue again, the postman arrived bright and early at 10am today which is really early for him and there was a small packet on the doorstep ready to be investigated. It was my newest butterfly die from marianne designs and I have got stuck in with it already. It's larger than I expected around 4'' to 5'' wide and cuts beautifully, the paper is easy to release from it, even tho it is so filligree. here are a few cards I did this afternoon along with one of the older Marianne Butterfly dies,  hope you like them.  


The background to this card is some ordinary pink card around 250gsm embossed in an leafy embossing folder though the cuttlebug and then dusted with a pink mirca powder,  The picture doesn't show the wonderful shimmer it has. The backing toppers are from the spellbinders collection of dies moroccon motifs and picot edged circles and the topper sentiment was from a kit from hunky dory . Add some gems and a bow and you have the finished result


This card was made using kanbans 'spring blossom'  clear stamps, the backing cards was embossed the same way as the above card and dusted with an olive green micro powder. Then I cut it into 3 sections and then matt and layered to add a little interest. I like that affect and you will be seeing it again. Tim Holts distress inks work well in floral images I find and I stamp with them a lot . I used peeled paint green ink pad on this occasion The spellbinders labels 3 are a nice size to stamp on. add a Marianne designe butterfly on the side, a few pearls , silk flowers and hatpins in the corners to finish it nicely


This card shows off the beautiful detail you can get from a Marianne butterfly die if you would like to purchase any of the matials I used on these cards from your cutting machines to ink, check out the range on offer at .j and c creations